Sunday, October 17, 2021

My Garage Door Opener Lamp

My Garage Door Opener has been keeping the light on all the time.

This problem happens more often in warm weather.


You are saying, “Replace the circuit board.” Well I did replace the circuit board last winter but the problem came back this summer. I think that the problem is heat related.

Did you know that some big companies are making LED light bulbs with the motion sensor built in? The light bulb also has an auto-off feature. Even if the Garage Door Opener lamp socket is live, this LED  motion sensor LED light bulb will turn off after awhile. Problem solved with very low cost!


The naked light bulb is very bright, so a translucent shade has been added. This type of lamp shade is called a “Sconce.”


If the lamp socket in the Garage Door Opener is live, then the light bulb senses the motion of the car and turns on.  Or it turns on then the car door opens. Then the light turns itself off after a few minutes.

If the lamp socket in the Garage Door Opener working OK like now during Fall in cooler weather, then the light bulb turns on and off with the Garage Door. Either one is good. The Garage Door opener will last a few more years.

These light bulbs are available in packs of two. I will put the other one into a light-up Halloween ornament.

fin

Thursday, February 4, 2021

My Rainbow

 Recently experienced some actual rain falling from the sky. 

It's been awhile! Next picture is same image though higher resolution.


Zoomed out and there was a double rainbow.


The rainbow is backlit from the east. Picture point of view is looking northwest 

January 29, 2021 8:47 AM. 

LG Tribute Dynasty handy phone camera.


Camera phone is sitting atop a brick wall for steadying purpose. Hand-held camera shot was blurry.

fin

Saturday, May 23, 2020

My 2004 Ford Explorer Breather Hose


My 2004 Ford Explorer was getting about 14.2 miles per gallon of gasoline. A few mechanics had checked things at the local lube shops. The engine passed a smog check OK.
.


One day there was a puddle of coolant on the top side of the engine. The thermostat housing was leaking. On closer inspection I saw that the thermostat housing was made of plastic. So I got a metal thermostat housing. While I was installing the new thermostat then I happened to touch this item.
.
The black rubber put a stain on my hand. This item is called “PVC Breather Hose”.  The PVC breather hose was disintegrating. The hose, it turns out, was porous and leaking. A new one costs more than twenty dollars. A foot or so, of 5/8” fuel hose costs less than five dollars.
.
I had bent and twisted the new hose for a half hour before cutting it to length and installing the hose. The result is every bit as good as a fancy expensive hose. Also I have some extra 5/8” fuel hose to share with my friends.
.
Getting back to the beginning, the truck is now achieving 16.8 miles per gallon of gasoline on the same driving cycle as before. That old breather hose had been costing me money at the fuel pump, using about 108 extra gallons of gasoline during the past 10,000 miles of driving, or about $300 to $400.
fin

Sunday, July 7, 2019

My Projects 2018


During the past year or so I have been building some electronic projects at home during my spare time.

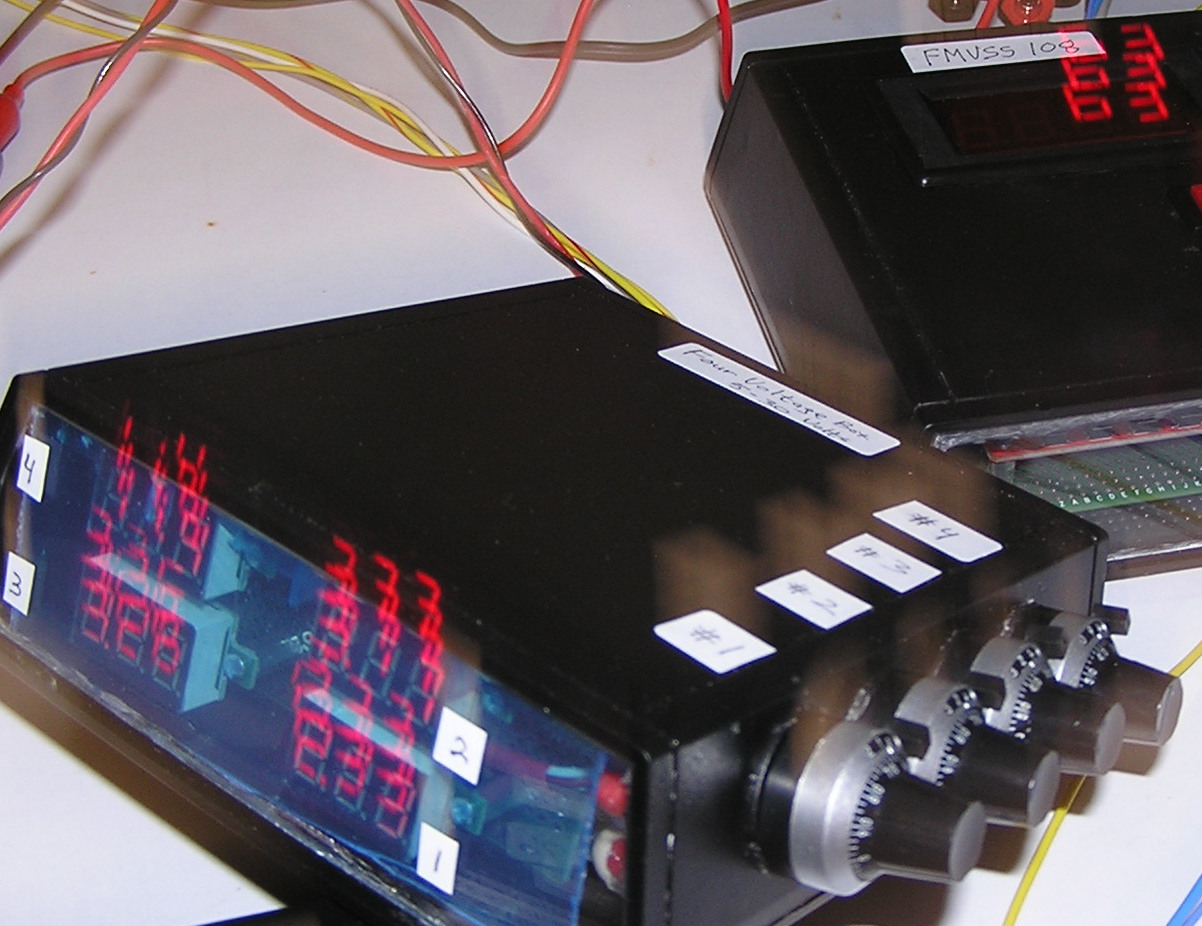
These are small hand-held test instruments. Top right is an event counter module.

The event counter module will count the number of events (off to on transition) during a set length of time.


Bottom left is a voltage source module.

In a vehicle, voltages can represent fuel level, air pressure, ride height, etcetera.

For my test bench, I needed a module that could simulate these voltage inputs to a control system.

The voltage source module has four resistors, four voltage displays, and four circuit protection items, i.e. 250 milli-ampere fuses.

Grab one of these ten-turn knobs and select any voltage from zero through five volts.

Read the four voltages from the endplate window.

Kind of like an early tricorder.

From Wagon Train. Before there was a Star Trek.

The next project started out simple enough.

Generic 4 - 20 milliamp current loop input is a very low voltage which goes through a variable resistor to ground.

Connected to "Instrument Ground" in the vehicle.  Not "Chassis Ground".

The box seemed kind of empty. Needed some more things to fill it up.
It has three resistors and three switches, for use when things go right.
It has three of the 200 mA fuses for when things go wrong.

Why not add some milliameters?

Why not add some nifty 0 - 100 % nameplates?

Each resistor has a switch that may connect one end, or the other end, of the resistor to "Instrument Ground."

Some fuel level sensors have five ohms when empty, 90 ohms when full.

Some fuel level sensors have 90 ohms when empty, five ohms when full.

In any given prototype vehicle, we don't know which type of fuel level sensors we are going to get.  Using this test box, we can just flip a switch to select which end "0%" or "100%" represents "Fuel Tank Full."

RESOLUTION

Off-the shelf behavior of the milliamp meter would indicate zero for any amount of current less than ten milliamperes.

We need to measure four milliamperes and up. Therefore we choose to change the resolution of the milliamp meter.

We will change the resolution ten-to-one, so that  the ammeter will read all the way down to one milliampere.

The original shunt wire probably had a resistance of 0.005 ohms or so.

Replacing that with a 0.05 ohm resistor resulted in some readings that were a little too high. A little bit more that 10 to 1. In other words the readings were inaccurate.

Experimenting with some small value resistors, a parallel combination of 0.49 ohms and 0.05 ohms brings about 0.049 ohms.

The results are pretty good.  We add 0.39 ohm (black orange white gold) and 0.01 ohm (black brown black gold).

I did not hack in far enough to move the decimal point on the display.

0.39 ohms and 0.1 ohms makes 0.49 ohms approximately. 
0.49 ohms in parallel with 0.05 ohms results in 0.49 ohms approximately.


Reading is 0.5 milliamps low. Good enough for bench work.


[Projects_3F.JPG]

[Projects_3H.JPG]

[Projects_3I.JPG]

fin

Sunday, September 30, 2018

My Old Lamps


I have some old style halogen lamps which use 150 watts.

Time to upgrade to LEDs.

When I disassembled lamp #1, I found a burned wire.
Might be time to check your lamps, too!
 
The other lamp wiring was OK.
New lamps are expensive.  So, high time for some maintenance.

 
First I replaced the “halogen lamp socket”. Then I added one of these LED replacement bulbs.


It is a “warm white bulb” which means it is a little dim.  That is OK when I have to get up before dawn to catch a plane or something like that.

For the other lamp I decided to add a big LED lamp fixture.

The Cloudy Bay item shown here is held together by three bolts.


I brought one bolt to the hardware store to match the M6 thread and got three real long bolts 100 mm long.  Add 25 ~ 50 mm to the existing bolt length.

Then I made three holes in the old lamp shade and bolted the new LED lamp into place.

Three new bolts and three existing nuts.


These new LEDs are cool “white which” means really bright. 
The lamp looks good whether on or off. 

This lamp is kind of like strobe lights though, giving out 120 flashes per minute.  If I wave my hand right by the light, I can see some strobing effects.
Perhaps there are some better LED lights out there, which would have more components such as capacitors to store some energy and reduce the voltage ripple inherent in the 60 cycle AC power.  A more-expensive lamp fixture might give a more steady light.
Then again I could build some rechargeable batteries into the lamp base, which would run the LEDs on direct current. Light output would be steady.
The search for a suitable replacement goes on.

fin

Sunday, October 11, 2015

My Truck's door lock

Recently was mending my truck because the door lock wasn’t working properly. 
The problem was traced to a simple plastic part.

In order to have one of these:


Had to buy (two) of these:

[

Luckily was possible to remove the white plastic part from the new lock cylinder,
then place the white plastic part onto the old lock cylinder.
I can keep the same keys, at least for now.
 
I am sure that somebody, someplace, has a bin full of the white plastic part 21970.

The white plastic part is shown as number 21970 on a drawing which I found on
 ( web site ) (Can't find it again!  If I do, will update).


Thinking that perhaps the 1994 Mustang lock cylinder would fit, the Mustang one uses the plastic/metal clip shown in the picture, and the plastic/metal clip is available at the parts store.

Fin

Sunday, September 13, 2015

Lightning

As you know, we are having a drought here in California.
Which means, any time that water falls from the sky
that makes the news.
 
Recently a big wind brought a big dust of off the construction site
and then large raindrops began falling from the sky.
 
Last time there was a  rain shower, I went outside and washed my car
in the rain
because that is all the water available for washing cars.
 
So on Tuesday, I was going outside to wash the car
in  the rain
when suddenly there was a flash and a boom.
 
They say that you can tell how far away the lightning is
by counting the seconds between the flash
and the boom.
 
This time, the boom seemed to have happened first,
because we humans can hear faster than we can see.
 
The lightning had struck a tree on the edge of the parking lot.
Very close to the building.
The lightning stripped the bark and some wood from a nearby tree.
 
Here is a close-up of the damage to the tree.


Lightning also
 
struck


a steel-reinforced cinder block wall.


Here is a close-up of the damage to the wall.
 
 
I did NOT go outside and wash my car that day!
 
fin