Showing posts with label hobbies. Show all posts

Sunday, September 30, 2018

My Old Lamps


I have some old style halogen lamps which use 150 watts.

Time to upgrade to LEDs.

When I disassembled lamp #1, I found a burned wire.
Might be time to check your lamps, too!
 
The other lamp wiring was OK.
New lamps are expensive.  So, high time for some maintenance.

 
First I replaced the “halogen lamp socket”. Then I added one of these LED replacement bulbs.


It is a “warm white bulb” which means it is a little dim.  That is OK when I have to get up before dawn to catch a plane or something like that.

For the other lamp I decided to add a big LED lamp fixture.

The Cloudy Bay item shown here is held together by three bolts.


I brought one bolt to the hardware store to match the M6 thread and got three real long bolts 100 mm long.  Add 25 ~ 50 mm to the existing bolt length.

Then I made three holes in the old lamp shade and bolted the new LED lamp into place.

Three new bolts and three existing nuts.


These new LEDs are cool “white which” means really bright. 
The lamp looks good whether on or off. 

This lamp is kind of like strobe lights though, giving out 120 flashes per minute.  If I wave my hand right by the light, I can see some strobing effects.
Perhaps there are some better LED lights out there, which would have more components such as capacitors to store some energy and reduce the voltage ripple inherent in the 60 cycle AC power.  A more-expensive lamp fixture might give a more steady light.
Then again I could build some rechargeable batteries into the lamp base, which would run the LEDs on direct current. Light output would be steady.
The search for a suitable replacement goes on.

fin

Sunday, October 11, 2015

My Truck's door lock

Recently was mending my truck because the door lock wasn’t working properly. 
The problem was traced to a simple plastic part.

In order to have one of these:


Had to buy (two) of these:

[

Luckily was possible to remove the white plastic part from the new lock cylinder,
then place the white plastic part onto the old lock cylinder.
I can keep the same keys, at least for now.
 
I am sure that somebody, someplace, has a bin full of the white plastic part 21970.

The white plastic part is shown as number 21970 on a drawing which I found on
 ( web site ) (Can't find it again!  If I do, will update).


Thinking that perhaps the 1994 Mustang lock cylinder would fit, the Mustang one uses the plastic/metal clip shown in the picture, and the plastic/metal clip is available at the parts store.

Fin

Saturday, January 17, 2015

My Washing Machine


My appliances are twelve years old.
Sooner or later I will have to replace them.
I told you about my clothes dryer over

here.

Before starting work, I unplugged the washing machine's power.
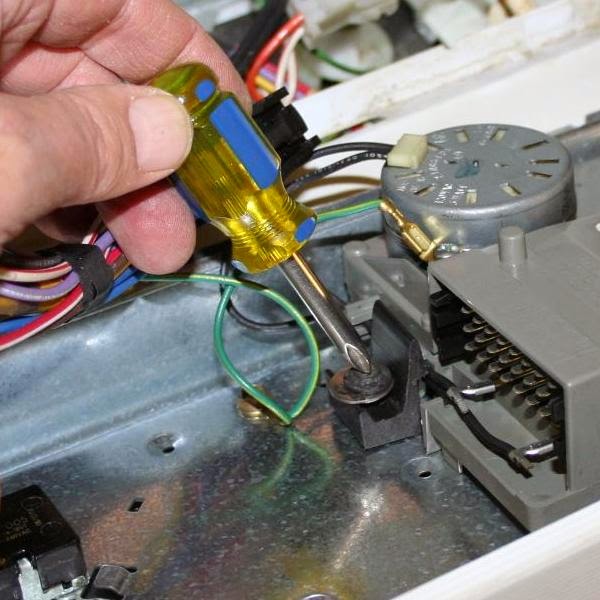
Here is a look at the Clothes Washing Machine's Innards:
 
The Large Gray item is connected to the knob on the
front of it's control panel, which no longer worked.
The Large Gray item is the Controller.
 
As you can see, the Controller has a motor to make the knob spin
(green arrow) while the washing machine is washing my clothes.
Two plastic tabs are holding this side of the controller
Onto the front panel (red arrows).
No problem here!
I added some plastic friendly lubricant "Tri-Flow"
to the part that spins with the knob (blue arrow).
This lubrication helped a lot.
 
But then
on the other side of the Controller
there was only one plastic tab, which had broken off.

The Controller would sag back and then the knob
wouldn't be pushed in and the wash cycle wouldn't start.
Rather than run out to the hardware store,
I found these hard rubber items which are actually
shower door bumpers.
I cut down the hook on one of these bumpers
Very carefully.
 
I held the item with pliers as shown, while trimming the part.
Not with my fingers.

The trimmed piece grabs on to the Controller.

After rummaging through my supplies I found a bolt and, ahem, washer
that would hold the rubber bumper down securely

Then I put some strong, hold-it-to-everything glue
in-between the rubber bumper and the controller..
 
 
After being heated with an incandescent light bulb for about twenty minutes,
the glue foams up a little bit to fill the space (not shown).
Now the Controller is secured to the front panel,
the knob can be pushed in or pulled out
and I am back in the laundry business.
fin
Wednesday, October 1, 2014

My Lamp

                                     I have a hanging lamp in the living room of my house.
                                      The lamp looks OK from a grownup point of view.
                                              If the viewer is tall, the lamp looks fine.

                         However, a little kid on the floor can look up and see the bare lamp bulb.

                                The bare bulb throws a lot of glare when the lamp is turned on.
                             To remedy the situation I added a lens bowl from another lamp.
                                      I drilled three, one-eighth inch holes equally spaced
                                                     around the rim of the lens bowl.

 
                      The lens bowl is threaded with some wire that has high temperature insulation.

                                     These three wires will support the hanging lamp bowl.

                                          The hanging lamp has some vents for cooling.
                                        The three wires are bent into the shape of hooks,
                                                   threaded through the cooling vents,
                                      and bent into place to support the added lamp bowl.

                                                 The resulting lamp is much better.

                                          The light quality lights up the darkness well, too.


fin

Sunday, August 10, 2014

My Clothes Dryer

My clothes dryer has been "marking" my clothes.
The problem has been getting worse lately.


I decided to disassemble the clothes dryer to see
what the problem was, and
if it could be repaired.

I found some buttons.
Lots of buttons.
That explains where my buttons have been going.

Next I found ten years worth of lint.
The clothes dryer will probably work a lot better
Without this brick of lint clogging up the air flow.


What could have sheared off all these buttons?
Perhaps it was the edge of this big hole.


I had found this weird item in the laundry some time ago.
More than a year ago.
At the time I had no idea of:
What this item was,
Where it had come from, and
Why it magically appeared in my laundry.


It certainly is lucky that I didn't throw this thing away
Even though I didn't know what it was.
I tend to save things like that,
in case I might be able to solve the mystery later on.


It fits perfectly in the hole!
Mystery solved.
Clothes dryer repaired.
fin
Saturday, December 28, 2013

My Smartphone Pad

I used to roam around looking for a good smartphone signal so that I could connect with the Internet. Sometimes I would have to walk over to the cell phone tower to sent a text message.

Recently I had bought a floor mat at the auto parts store. This floor mat is rubber with 3/16" thickness all around, the thickness varies from 1/16" to 3/16". For some reason my smartphone texting features work better when the smartphone is placed on this rubber mat.

In this picture the floor mat has been marked with a Sharpie Silver pen. This type of pen works well on a black surface. I marked a rectangle which is about one inch larger than the smart phone itself.

After cutting the outline with heavy duty scissors, the finished product looks like this.


Since it works now, I will find some way to tolerate this rubber matte on my desk.
Fin.

Sunday, November 10, 2013

My Shoes

                                            I keep my shoes on the front porch.

                                The other day I went outside to fetch my shoes and

                                       I found that my shoes were full of water!
                              At first I thought that this might be some type of prank.

                               I imagined someone sneaking up onto my front porch 
                          with a bucket of water who would then fill my shoes with water.

                                       During further examination of the surroundings,
                                              a broken sprinkler has been located.
                      The sprinkler isn't completely gone yet, and it is broken in such a way
                                               as to soak my front door and porch.


                                    I don't believe that a little duct tape will fix this one.
                                    Update: November 12 The sprinkler has been repaired... for now.
fin.

Sunday, July 22, 2012

My Helicopter


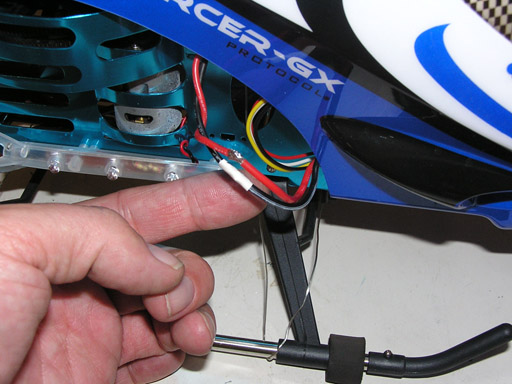
This helicopter used to be fun, but then his behavior became unpredictable and erratic. When I picked up the helicopter, I could feel that the red and black wires were very hot.

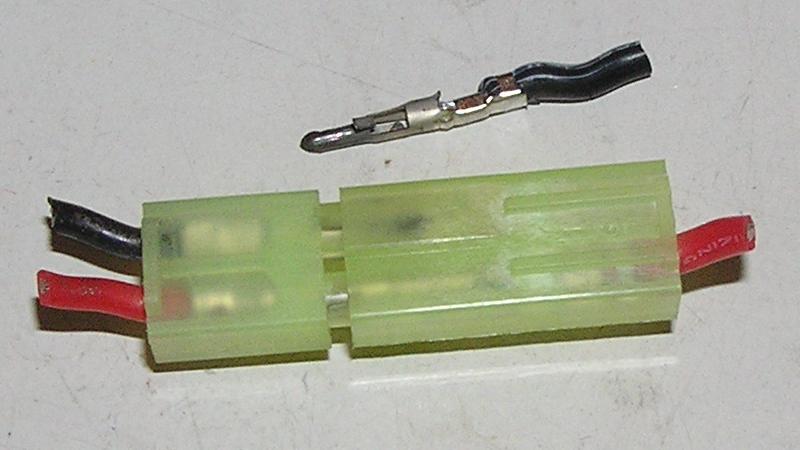
A closer inspection found that the black wire was actually loose in the connector.

After de-mating the connector, a black spot of burned plastic can bee seen exactly where the black wire had been connected loosely inside of the connector. The metal coating on the connector has turned black. There's the problem!

Even when the connector is mated together, we can see the black spot through the translucent plastic. This is what to look for on your electric powered helicopter.

The solution is to get rid of the connector and then carefully weld the black wires together.

Cover the black wire connection with electrical tape, then weld the red wires together. Tape the red wire as well. The resulting connection is probably lighter in weight, than the connector was. Removing unnecessary weight is key to successful helicopter performance. The helicopter works better than ever.  These red and black wires don't get hot anymore, hence the electric motors have a little more power.
Fin.

Wednesday, July 20, 2011

My Communicator

When it comes to hobby time, a few sacrifices have to be made. There is a need to have a communicator that actually works. Download a chirpy ringtone to a smart phone, add the snazzy grid and here is a product that people would actually buy. Perhaps the communicator prop is broken forever? No, the gold (plastic) grid was cut apart carefully, so that the pieces will glue back together again as necessary.

Ingredients as shown are one smart phone, one snappy plastic case for the smart phone, a "Communicator" prop, and some transparent plastic tape.

Tape onto the gold grid first, wrap the tape around the snappy plastic case and cover the exposed sticky part of the tape. Trim with a hobby knife, or ask Dad to trim it for you.

A few extra tips: Be sure that the gold grid does not touch or bear against the touchscreen of the smart phone. Be sure that you can see the little light that winks at you in red when your friend calls. Just the thong for your costume.

fin